Repairing large holes in
plasterboard walls and ceilings
To repair a large area of damage to plasterboard, the damaged area needs to be cut out back to the frame and a new piece of plasterboard fitted.
Check the thickness of the existing plasterboard before buying a new piece as plasterboard does vary in thickness and the new piece needs to be the same thickness as the original - two thicknesses are commonly used, 13mm (1/2 inch) and 8mm (3/8 inch).
Below we explain how to repair a damaged area of plasterboard wall, however the method can also be used when repairing large holes in plasterboard ceilings, just consider all references to 'vertical studs' to refer to 'joists'.
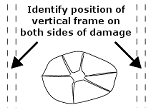
 Find
the positions of the vertical studs on both sides of the damaged plasterboard.
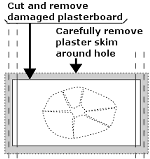
 Mark the area of plasterboard to be removed - vertically the edges need to be about half way
across the front face of the studs (which are typically 50mm (2 in) wide), horizontally the edges need to be beyond the area of damage.
 - Cut
away the damaged area using
a sharp craft knife - before cutting, check for any electrical cables behind the plasterboard; don't worry too much about any pipework behind the plasterboard as this shouldn't be damaged by a small knife.
- Where the original plasterboard had been skimmed with plaster, the plaster skim about 50mm (2 inch) around the hole needs to be removed - this makes it easier to blend the new piece of plasterboard in with the original plasterwork.
Position a metal straightedge along the outside of this area and use a craft knife to score the plaster surface, then remove the plaster between this line and the edge of the cutout using a filling knife or scraper.
 Secure the
corners of the existing plasterboard to the vertical studs just above and below the cutout using plasterboard nails or screws.
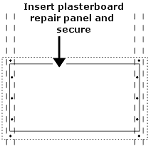
Measure the cutout in the plasterboard.
Cut a piece of new plasterboard to size and fit it into the hole.
Use plasterboard nails or screws to fix the new plasterboard to the vertical studs.
- Apply scrim embedded in filler/plaster across the joint between the new plasterboard and the original.
- Where the original plasterboard had been skimmed with plaster, skim the area of the repair with a thin coat of plaster and smooth it off level with the original plaster.
