Simple low level decking
Low level decking is the simplest to build and can be built where the ground is level either naturally or through landscaping.
As with all decking, it can be built against a building, possibly with patio door opening onto it, or free standing elsewhere in the garden.
The assembly procedure
- Mark out the area for the decking and clear the area of all vegetation to about 10 to 12.5cm (4 to 5 inches) below the level of the surrounding ground.
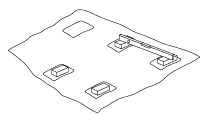
- Check the level of the ground by laying out house bricks in position to support the end of each joist and evenly along the length of the joists to support it -
- if using 100x50mm (4x2 inch) joists, supports should be no greater than 1.5m (5ft) apart,
- if using 150x50mm (6x2 inch) joists, supports should be no greater than 3m (10ft) apart.
The spacing between joists depends upon the thickness of the deck planking:- 30mm (1.25 inch) thick decking, space joists at 40cm (16 inches) maximum.
- 50mm (2 inch) think decking, space joists at 60cm (24 inch) maximum.
 Working from one corner, use a spirit level (on a length of straight timber if necessary) between bricks to make sure that the top of the bricks are reasonably level (this is just a check to remove the need to dig out the ground later).
 - Remove the bricks and lay a weed suppressant membrane over the area.
- Replace the bricks in their position on the membrane, if the ground is known to become waterlogged, use a 45 cm (18 inch) square paving slab under each brick to raise the top of each brick above the surrounding area - this should keep the joists out of laying water.
If the ground has recently been used as a flower/vegetable plot or has been built-up, using slabs under the bricks will help support the decking. - Mix up some mortar (5:1 sand:cement) and bed the first slab, (if used), in place on the membrane, and bed the brick on top of the slab - if a slab is not used, bed the brick directly on to the membrane - if the brick has a 'frog' (a deep indentation on one face), place the 'frog' downwards. Working from the first slab/brick, bed the remaining slabs/bricks in place checking the levels and positions against the previously laid bricks as you go - remember to allow for any run off you want on the decking.
- When all the slabs/bricks have been laid and the mortar has hardened, cover the membrane with clean gravel to just below the level of the top of the bricks or slabs.
- Cut out pieces of damp proof course material (dpc) to cover the top of each brick.

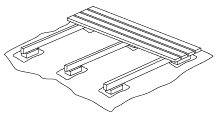
Place a piece of dpc on each brick and put the joists in place on top of the pieces of dpc.- Lay the first decking plank in place at one end of the joists. Drill and lightly countersink two holes at each joist position on the decking plank and fix the plank to the joists using rust proof screws (stainless steel or galvanised, don't try to use brass screws, they are not strong enough to screw into hardwood). Start by only fixing one screw at each joist, fix the remaining screws when you have checked the position of the joists on the bricks.
 Install the remaining decking planks in a similar manner using a couple of spacers between planks to keep the gaps consistent - each spacer can be just a piece of 6mm (1/4 inch) plywood.
