Roofs - fixing ridge tiles
mortar bonded - fixing systems
Safety: Working on a roof involves working at height , so always use scaffolding or other stable platform, never use just ladders (even on a bungalow).The top of pitched slate and tiled roofs (i.e. the ridge) is usually sealed by ridge tiles which sit astride the apex and overlap onto the roof covering on both sides.
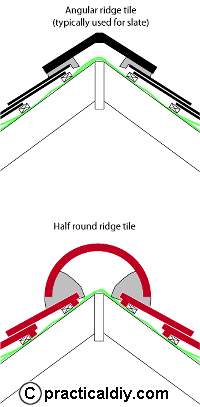
Two commonly used profiles for ridge tiles are half round and angular; the angular ridge tiles are usually used for slate roofs - each profile are illustrated below.
Modern roofs sometimes use ridge tiles which incorporate vents for ventilating the roof space, these are normally fitted every 4th or 5th tile along the ridge.
Where the roof design has different ridges meeting, (such as a horizontal ridge meeting angled hip ridges or two horizontal ridges joining), the ridge tiles have to be cut so that there is a uniform gap of about 10mm where they meet - this gap allows for a neat cement joint.
Traditionally ridge tiles are affixed to the the tiles/slates on both sides using a bed of mortar on each side of the ridge, most modern tile manufacturers offer a method to mechanically secure the ridge tiles without mortar - see below.
In older properties, ridge tiles sometimes become loose especially where old lime mortar breaks down.
Cracked and crumbling mortar should be carefully removed using a hammer and chisel from the surface of the slates/tiles, from the ends of adjacent ridge tiles and from the underside of the ridge tile if it is being re-used.
If the ridge tiles are firmly attached to the roof but the mortar between them is cracked, this mortar needs to be replaced:
- Rake out the joints to remove all the loose mortar.
- Apply a bead of non-setting mastic to fill the joint and smooth it off. Non-setting mastic is available in a range of different colours and a colour similar to the colour of the slates or tiles will hide the joint.
Mortar bonded ridge tiles
 The ridge tiles have
to seal the top of the roof and overlap onto the slates/tiles on each side by at least 75mm (3 inches), for slate and flat faced tiles this is achieved by using a fairly stiff 1:3 (cement:sharp sand) mortar bed along the tops of the tiles/slates. With tiles having a deep profile, the recesses are usually built up with small slips of flat tile bedded in mortar before laying the mortar beds for the ridge tile itself.
A solid bed of mortar is used at the ends of ridge tiles to fill the gap underneath where they met (see illustration below), a piece of flat tile slip (or slate) is used to bridge the gap between the sides of the roof and to support the mortar under and between adjacent ridge tiles.
Dampen the top of the roof before laying the beds of mortar - in hot conditions this is especially important to avoid the mortar losing moisture too quickly.
Before laying the ridge tile into the mortar, wet the inside and edges to help the mortar bond to it.
Position the ridge tile onto the mortar beds and push it down firmly - using a trowel to remove the excess mortar which will be squeezed out along the lower edges and smooth the joint - take care to avoid smearing the mortar on to the tiles. Ensure that mortar fills the gap between the ends of each ridge tile - smooth the mortar off at each joint as the ridge tiles are fitted.
Hip and Gable ends
On hip roofs, the end of the lowest ridge tile is cut so that it aligns with the bottom edge of the slates/tiles on the adjoining roof faces. A galvanised hip iron is usually secured to the hip timber at the lower end before the mortar bed is laid and the lowest ridge tile is set to just clear this.
The ridge tiles at gable and lower hip ends should be full length tiles, and this needs to be taken into account when cutting the tiles - i.e. cut ridge tiles should not be fitted at the ends.
Modern Building Standards and practice call for the 90cm (3 ft) of ridge tiles from gable ends to be mechanically secured to the roof ridge batten as well as any mortar bonding - one way to achieve this is to use special ridge tiles which are secured to the ridge board using a short length of galvanised wire, as an alternative, ordinary ridge tiles can be drilled to provide a fixing point for securing wire.
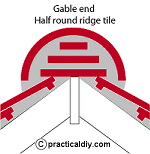
 The end of the half round ridge
tile which are exposed at the top of gables can either be filled with pieces of tile bedded in mortar (illustrated right) or, with modern ridge tiles, closed off using a pre-made end cap.
Mechanical fixing systems
Most manufacturers of roofing tiles offer a mechanical fixing systems for ridge tiles which removes the need for mortar.
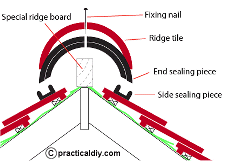
 A typical fixing system is shown to the right and consists of:
- Side sealing pieces that are laid along the sides of the ridge and provide the horizontal seal between the ridge tiles and the roof surfaces. Different style seals are available, usually these suit the profile of different roof tiles offered by that manufacturer.
- End sealing pieces which fit between the ends of adjacent ridge tiles to provide a seal.
- A special ridge board above the apex of the trusses which takes the fixings through the ridge tiles. This special ridge board has to be positioned carefully so that there will be a gap between it and the ridge tiles when they are fixed.
- Fixing nails (or screws) with seal washers, the nails are usually non-corroding (such as aluminium) and secure the ridge tiles to the special ridge board. .
This is only an illustration of a typical system, each manufacturer has their own systems which are probably not interchangeable.
While these mechanical systems are fine for simple, single ridges, they do become somewhat complicated where two roof ridges met.
