Fixing ceramic wall tiles
It is often better to start tiling on a simple, plain wall - you will see the result quickly and, if not used to tiling, get 'into the swing' of how to do it.
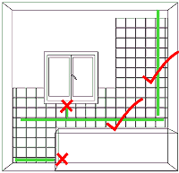
Starting points for fixing ceramic tiles
Once you have decided which wall to start with and have decided upon the vertical and horizontal starting points, drop the jury stick (or measure down) from the vertical starting point and mark the wall at the bottom of the last full tile.
Using a spirit level, fix a straight batten horizontally along the wall at the point marked - if fixed with nails, leave the heads exposed so that the batten can be easily removed later.
From the horizontal starting point mark, drop a batten vertically down the wall to the first batten and, after making sure that it is truly vertical using a spirit level, secure it to the wall.

Likewise if the horizontal start line is very short, (i.e. a couple of tiles under a window) reposition it to get a longer run of tiles.
Double check the squareness of the battens by laying a few tiles (3 tiles high and 3 tiles wide) loosely between the battens and check that they fit squarely.
Applying the tiles
Tile adhesive is available either as a powder for mixing with water or as premixed paste, there's not much to choose between them other than the premixed can be sealed for later use while a certain amount of mixed powder adhesive will be discarded each time.
Starting from the right-angle between the battens, spread some tile adhesive over an area of wall - keep it about three tiles high above the horizontal batten (but away from the edge row of tiles both vertically and horizontally) - do not cover an area greater than about 1 sq.m. (or sq yd) or an area which cannot be tiled in less than about 10 or 20 minutes (depending on the adhesive manufacturers recommendations). Using a notched spreader, comb the area to give a series of horizontally ridges.
Note: Notched spreaders often have at least two sets of profiles on the edges, 'V' and square - the 'V' notch is for 'light/ordinary duty areas' while the square notch is for 'heavy duty areas'. Tiling done with the 'V' notch has a lower percentage area coverage of the back of the tiles than the square notch - high percentage area coverage is important in areas subjected such as showers where the tiles may be subjected to large water contact.
Starting at the rightangle between battens, apply a tile at a time, pressing them with a twisting movement into the adhesive - never slide tiles other than for minor adjustment as the tile will slip over the adhesive thus reducing the amount of adhesive under it.
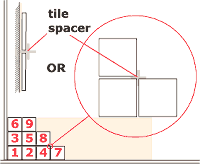
Butt the first tile up against the two battens. Fix the second tile along side the first one, either slide it up against the first tile (if the tiles have spacing lugs) or use tile spacers (if the tiles are plain field).
Remember to put any frieze tiles and/or individual decorative tiles in their appropriate positions.
 Note:
spacers can be used either flat at tile corners (where the four 'arms' separate four tiles) or with just an 'arm' separating the tiles while the adhesive sets - in this case, two spacers are required along each side of every tile to keep the space uniform.
If using the spacers 'flat to the wall', make sure that they are far enough back to allow a covering of grout, but not too far back such that they are in the adhesive but not actually touching the tiles.
Fix the third tile above the first, the forth to the right of the second, fifth above the second, sixth above the third etc. - as shown above right.
As each tile is fixed, make sure that it is pushed up against the adjacent batten and/or tiles with spacers if appropriate.
When you have done about 5 minutes worth of tiling, place a straight edge across the front face of the tiling to locate any which are standing proud, use a bit of figure pressure with sideways wiggle to seat any such - you will probably need to relocate the surrounding tiles as these may have slightly moved.
Also check the top row with a spirit level to make sure that the rows are level.
When you have finished tiling along the length of a batten, carefully remove the batten after leaving the tiles to set for about 24 hours. Make good the wall (if the nails leave neat holes in the wall, just put fill them with tile adhesive when you come to tile that area) and tile away from the original line of the batten.
When the manufacturers 'working time' has elapsed for the adhesive which was been spread on the walls, clean it all off neatly to the last fixed tiles and throw the adhesive away. Check the tile faces and the joints and clean away any adhesive, it should still be fairly soft and easy to remove.
Concentrate on fixing complete, field tiles - where you need to cut a tile in the middle of an area (such as to go around a pipe) or fit tiles behind a fixture, try to finish the tiling up to the point where you need to measure and cut the tile or move the fixture. Leave tiling the edges until you have finished the main areas.
At the end of a 'tiling session', clean and discard all remaining adhesive from the exposed walls.
