Fitting a corner shelf
A corner shelf can often make use of an otherwise useless area which cannot be used for other purposes. As the corner itself forms a triangular space, the shelf will normally only be usable to support small items, such as a plant etc.
The shelf can be supported by simple planed timber battens (50x18mm (2x¾ inch)) fixed to the walls on each side of the corner - this will give sufficient support for most purposes - alternatively metal angle can be fixed to the walls to support the shelf, this can give the impression that the shelf is unsupported - details are given below for using metal angle.
The shelf itself can be of various shapes however a triangular or a 'quarter round' shelf tend to be the most convenient - a square shelf means that the outer half is effectively not supported but the wall supports unless additional fixings are made above the shelf to prevent the 'back' of the shelf tipping up.
A general point to note is that the part of the shelf projecting forward of a line between the ends of the supports on the wall is effectively unsupported.

Using wooden batten wall supports
- Begin by cutting the wooden support battens:
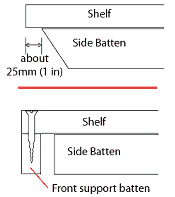
 Measure and cut a length of planed timber (50x18mm (2x¾ inch)) about 38mm (1½ inch) less than the shelf side measurement. Cut the end nearest the corner square across the timber, and the end at the front of the shelf at a slight angle (see right, upper) - this will make the batten less obstructive. (Alternatively, the front of the side support battens can be hidden by fixing a batten on the underside of the shelf, across the front (see right lower), this has the added advantage that it will strengthen the unsupported front edge).
 - Drill clearance holes for the fixing screws in the support batten - equally space these along the centreline of the batten. Usually only 2 fixings will be enough unless the shelf is especially deep. If the side walls are timber frame, the spacing for the holes in the batten will need to match the spacing of the vertical wall members.
Tip: If the shelf supports are going to be painted, apply the primer and undercoat before fixing them to the wall; apply the topcoat after the supports have been fixed to the wall and the screw head recesses filled.
Fitting the shelf supports
 Fix the support to the first wall
- Offer up the first support batten to the wall on one side of the corner at the height for the shelf and use a spirit level to set it level. Keep a back end away from the corner by just over the thickness of the timber. Mark the position of the fixing holes on to the wall through the holes in the batten.
- For masonry walls, drill suitable holes to take wall plugs and fix the batten using screws which enter the wall at least 38mm (1½ inch).
For timber frame walls, drill though the plasterboard and then fix the batten by screwing directly into the frame work.
- Fix the second support to the other wall
- Offer up the other support batten to the adjoining wall at the shelf height and use a spirit level resting on top of the first support to level it. Mark the wall through the fixing holes in the batten.
- Drill the wall and fix the support in the same way as used for the first support.
Fitting the shelf
- Take into account that the angle between the walls on either side of the corner may not be a true rightangle, and the corner itself will probably not be a sharp corner - therefore accurate measurement, cutting and some trimming may be required to get the shelf to fit tightly to the walls.
- Carefully mark out the shape and size of the shelf on the shelving material and cut it to size. For the best appearance, the finished edge or side grain of the material should be presented across the corner, so:
- Measure the length of the front of the shelf across the corner,
- Transfer this measurement to the finished edge of the shelf material,
- At each end of this measurement, mark the appropriate angle back behind the shelf front - this angle will be 45° for an equal sides shelf, for unequal sided shelves, adjust the angle as necessary,
- Cut the material along both sides.
- Corner shelving should be fixed to the support battens - with the shelf in position, mark underneath the side of the supports onto the shelf. Drill a hole halfway between the marks and the edge of the shelf to take a small screw, and countersink the top side of the shelf if necessary. Fix the shelf to the supports using a suitable screw from above the shelf and into the support battens.
 A batten fixed underneath the front of the shelf is not always required but it will stiffen the shelf and hide the side supports.
- Measure across the front of the shelf between the side walls and cut a support batten to length - cut back the ends by 45° vertically so that the ends will sit flat on the walls (the 45° is for an equal sided shelf - the angles will need to be changed if the sides of the shelf are unequal).
- Mark the position for the support across the shelf.
- Drill holes in the shelf and countersink them to suit the fixing screws - fix the support batten underneath the shelf using wood glue and screws.
NOTE: the heads of the fixing screws will not be visible if the shelf is above eye level; if the shelf is lower, the screw heads may need to be filled and painted to hide them.
Alternative support for corner shelving
 An alternative
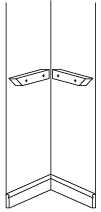
to using wooden support battens is to use lengths of metal angle (aluminium - 18mm (¾ inch) should suit most needs) to form ledges on each side of the corner to support the shelving - as illustrated to the right.
The approach for fixing the metal angle supports is basically the same as described above for the wooden support battens i.e.
- Measure the walls.
- Cut and drill the metal angle - include the holes for fixing the shelf material to the angle.
- Position the first metal support on the first wall and use a spirit level to level the angle.
- Drill the wall and fix the first side support but use dome headed screws instead of countersunk screws.
- Position the second metal support on the second wall and use a spirit level to level the second support to the first.
- Drill the wall and fix the second side support again using dome headed screws.
- Measure and cut the shelving material to fit into the corner so that it will rest on the horizontal face of the metal angle.
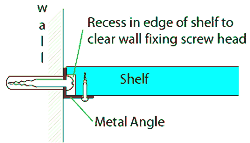
- Mark the positions of the wall fixing screws on the edge of the shelving and then cut away the edge of the shelf at these points so that the screw heads are cleared - only cut away the shelf at the screw heads and then only from the bottom.
- Fit the shelf onto the brackets and secure the shelf using short screws from below.
- Fit a strengthening batten underneath the front of the shelf if required.
